This weekend I got a second hand Dell Precisiion Tower that enterprise used as a server, inside included an IBM ServeRAID M5110 RAID card that wasn’t in RAID mode. Since I need ZFS and don’t like what I hear about harwdware RAID, it needed to be flashed to IT mode. IT mode is basically passthrough mode and becomes dumber than the RAID mode, since it doesn’t do any redundancy (that’s handled by ZFS in the operating system).
Unfortunately, the M5110 by default does not support IT mode so I need to flash another cards firmware onto it. Very very fortunately, someone has already done it and given a very well designed guide.
This was my first time flashing firmware to a card following a guide that assumed you had prerequisite knowledge of flashing firmware. Sadly, I don’t know how to read so it took a while to get it working. Thus, I thought I’ll write my own blog on how to do this if anyone needs it.
What You’ll Need
- A normal windows installation
- A spare USB you don’t mind wiping
- Some pliers
- The number at the back of the card that should start with “5006XXX XXXXXXXX”
- The M5110 firmware pack that is included in lazymocha’s tutorial. Here is the link and an alternative link.
Cross Flash the Card
- The first thing you’ll do while you have the card out and checking it’s serial (the number that starts with 5006…), is to remove the alarm.
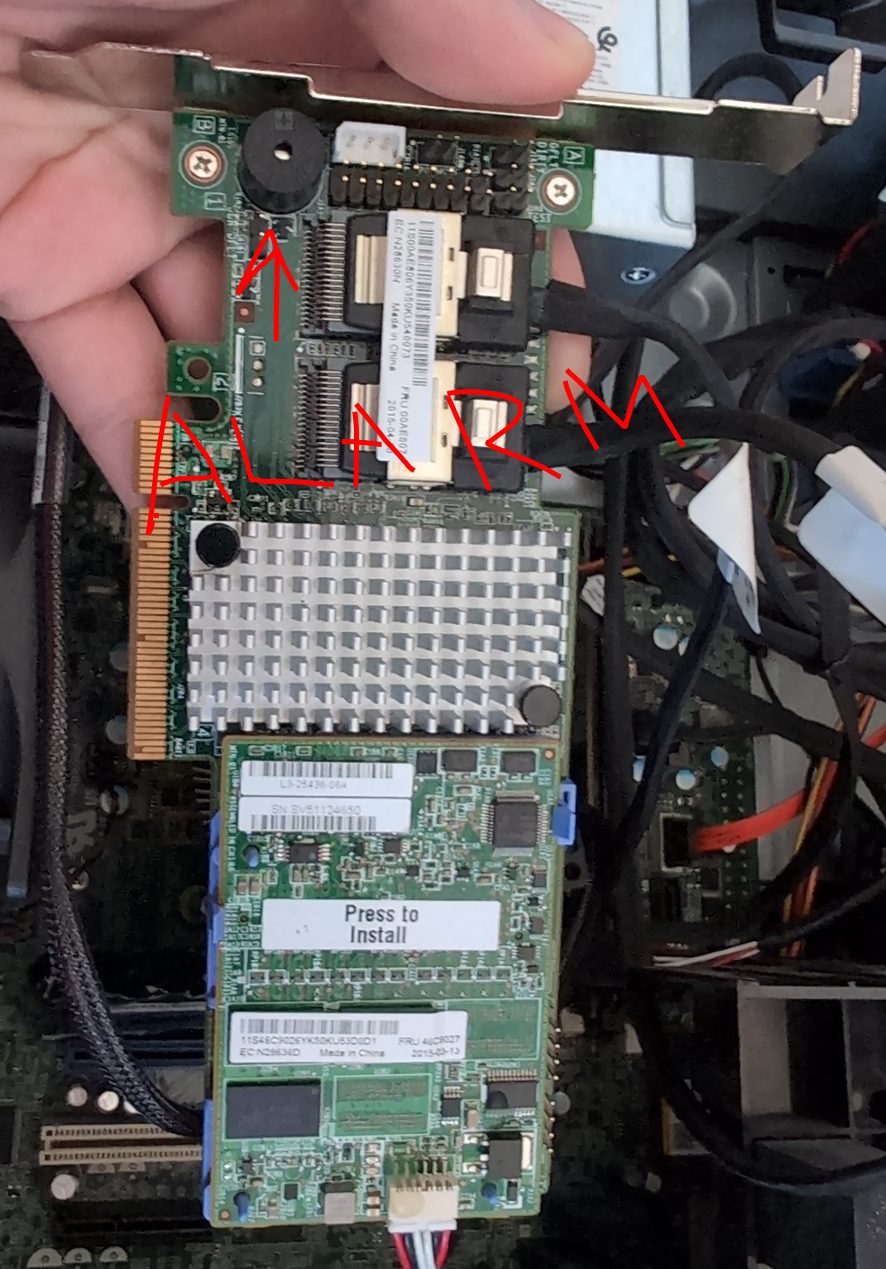 Use the pliers mentioned in the what you’ll need section to crush the plastic, not pull.
Once crushed, you’ll see a red muzzle where you’ll have to try your best to pull it off without damaging the card.
Use the pliers mentioned in the what you’ll need section to crush the plastic, not pull.
Once crushed, you’ll see a red muzzle where you’ll have to try your best to pull it off without damaging the card. - Plug in the card but don’t connect any cables to it. Also plug in the USB while you’re at it.
- Boot into Windows first
- Install rufus, have it select your USB and under “Boot Selection” select “FreeDOS.” No need to download an ISO file or anything, rufus already has it handled.
- Download and unzip the
M5110-firmware.zipfile found in this section: what you’ll need. - Copy the directory over to the new FreeDOS bootable USB.
You can put it in the root directory, or anywhere else (root meaning something like
D:\notD:\locale) - You’ll need to create EFI files for when we need EFI.
From lazymocha:
Create UEFI Bootable USB:
Create the folders boot\efi and efi\boot on USB drive.
Copy the file Shell_full.efi to both folders and to the root folder of the USB drive, and rename it to BootX64.efi
Copy the file Shell_full.efi to both folders and the root folder, and rename it to ShellX64.efi
When you’re done, you will have the same file to the USB drive 6 times, in 3 folders, named both BootX64.efi and ShellX64.efi
- Reboot and enter the BIOs to choose booting in “Legacy” or you might see “BIOs” mode.
- Once BIOs mode selected, exiting the BIOs should boot you right into FreeDOS unless you have another disk that is legacy bootable.
- Once in DOS, you’ll see a screen that mentions
to enter WebBIOs or for Preboot CLI. Ignore this screen and wait for the screen where you see the prompt C:\ - From here, you’ll want to enter the
M5110-firmwaredirectory you copied into the root of this USB so enter:
dir
to check where the directory is change directory into it:
cd M5110-firmware
- Once in, now you can start entering commands from lazymocha:
megarec -adplist(note the adapter number, assuming it is 0)
sas2flsh -list(note the SAS address) this command won’t work right now
megarec -readsbr 0 m5110.sbr(backup SBR)
megarec -cleanflash 0soft reboot to FreeDOS, this is CTRL+ALT+DEL
megarec -m0flash 0 2208_16.rom(flash recovery firmware)soft reboot to FreeDOS, this is CTRL+ALT+DEL
megarec -writesbr 0 512byte.bin(wipe old SBR with empty)
megarec -cleanflash 0
- Finally, reboot to the BIOs again and change the mode from legacy back to UEFI. Change boot order to your USB stick first and exit the BIOs to enter the UEFI shell.
- Once in the UEFI shell, you want to cycle from
fs0:tofs5:, if you still can’t find where the files are I can’t really help ya. To cycle between them, just typefsX:from the shell. To see if your files are there, just typelsordir. - Find your
M5110-firmwaredirectory andcdinto it. - Now you can finally run the
sas2flash.eficommands.
From lazymocha:
sas2flash.efi -list(adapter should be listed)
sas2flash.efi -o -f 20.00.02.00_07_it.fw -b bios_07.39.00.00.rom(cross-flash with 2308 IT rom and BIOS)
sas2flash.efi -o -b uefi_07.27.04.00.rom(cross-flash with 2308 UEFI BIOS)
sas2flash.efi -list(adapter should be updated to SAS 2308)
sas2flash.efi -o -sasadd 5006xxxxxxxxxxxx(re-program SAS address)
- Check if everything works with the
sas2flash.efidiagnosis:sas2flash.efi -list. If Firmware Product ID says(IT)then you’re good. - For the last time, reboot and go into Linux or back to Windows.
Good luck!
Thanks To
lazymocha: For the guide and files.
kyletsenior: For the extra information on lazymocha’s guide.
blanchet: For explaining how to check if the card is in RAID or IT mode.
sergei: For explaining the flashing process so that a Linux user can understand better.
^ the links above are all blog pages and forums that I found helpful.
>> Home